
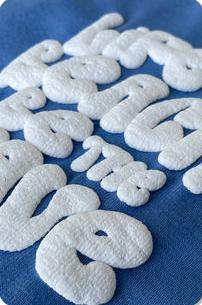
Compare puff printing for your garment brief: Raised lettering and simple graphics on tees and sweatshirts. Confirm the proposed specification on a physical sample.
A puff additive expands during heating, raising the printed layer above the cloth. The relief comes from the ink layer rather than embroidery thread.
What to compare in the image
The angled close-up reveals letter thickness, a fine granular surface and shadows. Compared with conventional screen print it has greater relief; unlike 3D embroidery it has no aligned thread surface.
Properties and limitations
Broad lines and simple shapes are suitable starting points. Fine strokes, tight gaps and large coverage can affect definition, expansion and flexibility.
External visual samples, not a factory sample.
How to specify puff printing
Choose the ink or transfer system for the actual fabric, stretch and finish. Compare graphic size, colour, edge detail, surface feel and adhesion on a physical trial. Review care conditions and any relevant durability checks before the run; one successful application does not prove compatibility with every garment.
What to send for sampling and a quotation
- Garment samples, intended wear and destination market.
- Material composition, weight, colour and the proposed finish.
- Quantity by style and colour, target timing and approval responsibility.
- Artwork dimensions and placement; measurement and care requirements.
Sample approval and repeat orders
Keep the approved material or decorated garment, its revision and the agreed check results together. For a repeat order, confirm the material lot, shade, artwork version and current conditions again. Price, minimums and schedule follow the actual specification; photographs show appearance and do not establish tested performance.
Compare fabric options · Compare decoration options · Prepare a development brief · Agree inspection requirements